Preparing Kitchen for Spring Cleaning: A Kitchen Cleaning Checklist
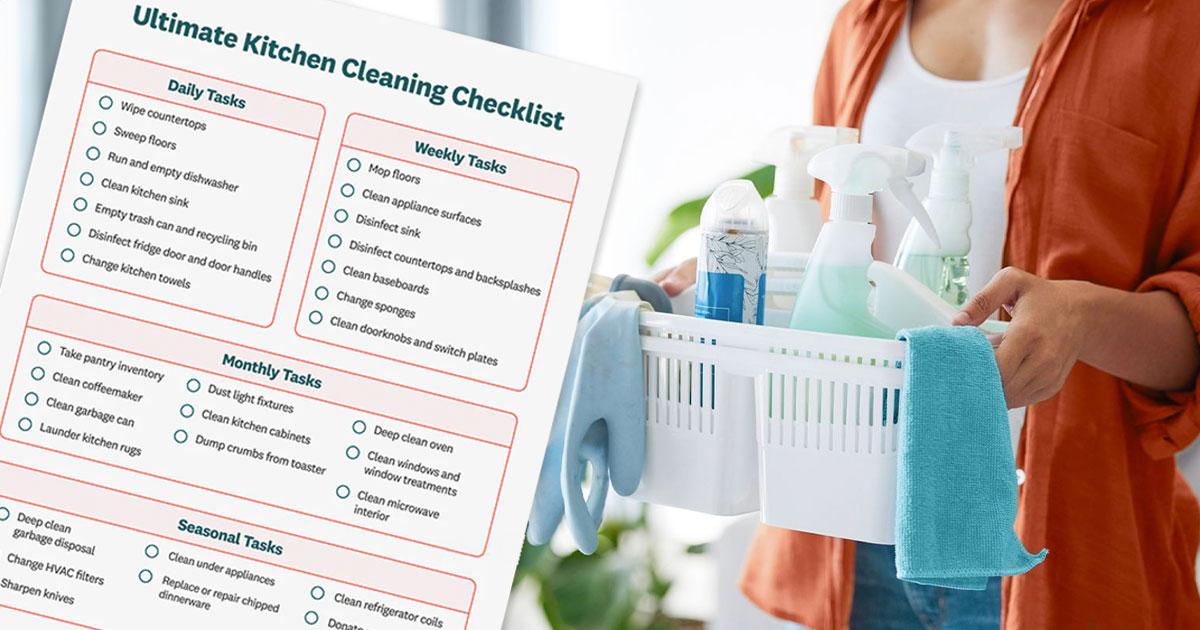
Spring ushers in a feeling of renewal, making it an ideal time for a deep clean. Your kitchen, the heart of your home, will greatly benefit from a thorough spring cleaning. A kitchen spring cleaning checklist helps you organize tasks and ensures every corner shines.
What does it mean when you do spring cleaning?
Spring cleaning means doing a deep, comprehensive clean that goes beyond everyday tidying. Unlike routine cleaning, which focuses on maintaining general cleanliness, spring cleaning aims to reach neglected areas and perform tasks typically done once or twice a year. This thorough approach ensures a cleaner, healthier living space by addressing dirt and grime that accumulate over time.
Why would you need to do this type of cleaning in your kitchen?
The kitchen experiences heavy use, making it prone to accumulating dirt, grease, and food residues. Here are some key reasons to do spring cleaning in your kitchen:
- Improve hygiene: Regular cleaning keeps surfaces and appliances tidy, but a deep clean tackles hidden dirt and bacteria, ensuring a healthier environment.
- Extend appliance lifespan: Deep cleaning removes grime and build-up from appliances, helping them run more efficiently and last longer.
- Prevent pest infestations: Clearing away food particles and spills minimizes the chance of attracting pests like ants and cockroaches.
- Enhance cooking environment: A clean and organized kitchen creates a more pleasant space for cooking and meal preparation, making these tasks more enjoyable.
- Prevent mold and mildew: Thoroughly cleaning areas prone to moisture, like under the sink and around the dishwasher, helps prevent mold and mildew growth.
- Reduce odors: Eliminating hidden food residues and grease prevents unpleasant smells from lingering in your kitchen.
Preparing for spring cleaning your kitchen
Gather all necessary supplies before starting the cleaning process. Use this kitchen cleaning checklist to stay organized:
- Cleaning supplies: All-purpose cleaner, glass cleaner, degreaser, disinfectant, dish soap
- Tools: Microfiber cloths, sponges, scrub brushes, toothbrush, vacuum cleaner, mop, bucket
- Organizing supplies: Storage containers, trash bags, labels
- Protective gear: Gloves, apron
- Additional items: Baking soda, vinegar, essential oils (for natural cleaning solutions)
Preparing these items in advance will make the cleaning process smoother and ensure you have everything required for a comprehensive clean. Begin by decluttering your kitchen: empty cabinets, drawers, and countertops. Sort items into categories like keep, donate, and discard. This step simplifies surface cleaning and allows for efficient reorganization of your kitchen.
Set up a cleaning station in a central location within the kitchen. Keep your supplies within easy reach to efficiently transition from one task to the next. Using a caddy or a large tray to hold your cleaning products can make the process more efficient.
Organize cleaning tasks into manageable steps. For example, begin with decluttering and organizing, then move on to cleaning appliances, wiping down surfaces, and finally, mopping the floors. Breaking down the tasks helps maintain focus and ensures that every part of the kitchen receives the attention it needs.
Preparing for spring cleaning with a detailed plan and the right supplies will streamline the process, making it more effective and less overwhelming. A well-organized plan guarantees a complete clean, resulting in a fresh, hygienic kitchen ready for the new season.

Getting started in deep cleaning the kitchen
A deep clean involves tackling every area of the kitchen, from appliances to cabinets. Follow this deep clean kitchen list to ensure nothing gets missed:
1. Declutter and organize
Take everything off the countertops, and out of the cabinets and drawers. Discard expired food and organize remaining items. Use storage containers to keep everything neat and labeled.
2. Clean appliances
- Refrigerator: Empty the refrigerator, defrost if needed, and clean the shelves and drawers with warm, soapy water. Wipe the exterior and vacuum the coils to maintain their efficiency.
- Oven and Stovetop: Clean the oven interior and stovetop with a degreaser. Remove and clean the burners, knobs, and drip pans.
- Microwave: Heat a bowl of water with lemon slices in the microwave for a few minutes. Wipe the interior with a damp cloth to remove food splatters.
- Dishwasher: Run a cycle using a dishwasher cleaner. Wipe down the door and gasket to eliminate residue and prevent mold buildup.
- Small Appliances: Clean the toaster, coffee maker, blender, and other small appliances. Remove crumbs and wash removable parts to keep them functioning properly.
3. Cabinets and drawers
Wipe all cabinet doors, handles, and interiors. Vacuum crumbs and dust from drawers. Line drawers and shelves with fresh paper to maintain cleanliness and organization.
4. Countertops and backsplash
Clean countertops with an appropriate cleaner for the material. Focus on grout lines on tiled backsplashes, using a toothbrush and baking soda paste if needed to remove stains and dirt.
5. Sink and faucet
Scrub the sink using a mixture of baking soda and vinegar. Polish the faucet and clean the surrounding area to remove water spots and build-up, ensuring a sparkling and hygienic sink area.
6. Floors
Sweep and vacuum the kitchen floor to remove dust and debris. Mop with a suitable floor cleaner, ensuring it reaches corners and under appliances where dirt can accumulate.
7. Windows and light fixtures
Clean windows with glass cleaner or a vinegar and water solution. Dust light fixtures and wipe bulbs to remove grime, keeping your kitchen bright and welcoming.
8. Trash and recycling bins
Empty and clean the trash and recycling bins. Use disinfectant spray to remove odors and bacteria, maintaining a fresh and sanitary area.
9. Pantry and storage areas
Sort through pantry items and discard expired products. Wipe down shelves and use storage solutions to organize items, making it easier to locate what you need.
10. Final touches
Add a few final touches to complete your kitchen’s spring makeover. Place fresh flowers or a bowl of fruit on the counter, and consider adding a new rug or decorative items to brighten up the space. This adds a personal touch and makes your kitchen feel more inviting.
Taking the time to thoroughly clean your kitchen not only improves hygiene but also makes the space more enjoyable to use. Following this deep cleaning kitchen checklist ensures that every corner of your kitchen gets the attention it needs, leaving you with a fresh, clean, and organized space for the warmer months.
It’s important to do deep spring cleaning on your kitchen
Deep spring cleaning keeps your kitchen healthy and functional by preventing bacteria buildup, extending appliance life, and creating a pleasant cooking environment. Using a deep-cleaning kitchen checklist ensures all areas are spotless and ready for the season. Regular deep cleaning maintains your kitchen’s beauty and functionality, making it more inviting for cooking and gathering. Embrace the season of renewal with a clean, fresh kitchen that you and your family will love.